Thursday, May 28, 2015

Ctrl+Z

So after a lengthy hiatus, I should probably send this blog to the farm upstate. I'll leave it up in case any of the information posted is helpful, although it may be woefully out-of-date by now.

I'm still working on multimedia free software, but mostly VLC Media Player and the Daala video codec these days.

Oh and we made a record:


Thanks for reading!

Wednesday, October 27, 2010

Looping playback with GStreamer

Recently on the GStreamer mailing list, someone asked how to loop playback using the playbin element. Since this seemed pretty straightforward, I thought I'd post it here. To clarify, playbin is a higher-level element that greatly simplifies typical playback scenarios. The code posted here is derived from this playbin example. The important addition is the bus callback, which simply listens for an end of stream (EOS) message, and upon receiving it, seeks to the beginning of the stream. This restarts playback.

#include <gst/gst.h>

gboolean bus_callback(GstBus *bus, GstMessage *msg, gpointer data)
{
    GstElement *play = GST_ELEMENT(data);
    switch (GST_MESSAGE_TYPE(msg))
    {
        case GST_MESSAGE_EOS:
            /* restart playback if at end */
            if (!gst_element_seek(play, 
                        1.0, GST_FORMAT_TIME, GST_SEEK_FLAG_FLUSH,
                        GST_SEEK_TYPE_SET, 0,
                        GST_SEEK_TYPE_NONE, GST_CLOCK_TIME_NONE)) {
                g_print("Seek failed!\n");
            }
            break;
        default:
            break;
    }
    return TRUE;
}

gint
main (gint   argc,
      gchar *argv[])
{
  GMainLoop *loop;
  GstElement *play;
  GstBus *bus;

  /* init GStreamer */
  gst_init (&argc, &argv);
  loop = g_main_loop_new (NULL, FALSE);

  /* make sure we have a URI */
  if (argc != 2) {
    g_print ("Usage: %s <URI>\n", argv[0]);
    return -1;
  }

  /* set up */
  play = gst_element_factory_make ("playbin", "play");
  g_object_set (G_OBJECT (play), "uri", argv[1], NULL);

  bus = gst_pipeline_get_bus (GST_PIPELINE (play));
  gst_bus_add_watch (bus, bus_callback, play);
  gst_object_unref (bus);

  gst_element_set_state (play, GST_STATE_PLAYING);

  /* now run */
  g_main_loop_run (loop);

  /* also clean up */
  gst_element_set_state (play, GST_STATE_NULL);
  gst_object_unref (GST_OBJECT (play));

  return 0;
}

Thursday, October 7, 2010

New Hey Predator! EP (apologies to the technical readers)

Since I do have the word music in the subtitle of this blog, I thought I should share some of ours for a change. My band Hey Predator! just finished a 5 song EP.
Enjoy:
http://heypredator.bandcamp.com/album/foxholes-and-atheists-and-so-forth

Friday, May 21, 2010

Building the GStreamer VP8 plugins

By now it's old news that Google has launched the WebM project. Despite its shortcomings, this is very exciting as at the very least, we are that much closer to a high quality open and free video format for the web...well, maybe.
In any case, I just wanted to quickly document the steps required to use the new VP8 plugins in GStreamer (also thanks to David Schleef for his feedback). VP8's build system leaves a bit to be desired so bear with me:

-Get the latest tarball of vp8 here.
-Configure with your target architecture, in my case:
./configure --target=x86-linux-gcc
-Build with the make command.
-Do an install (not as root):
make install
The resulting install directory will be called something like vpx-vp8-nodocs-x86-linux-v0.9.0
It will contain the following:
bin build include lib md5sums.txt src
-Go into this new directory
cd vpx-vp8-nodocs-x86-linux-v0.9.0
-Copy include to /usr/local/include/vpx (notice the renaming):
sudo cp -rf include /usr/local/include/vpx
-Copy the library to /usr/local/lib
sudo cp lib/libvpx.a /usr/local/lib
-Build gst-plugins-bad (git version or patch the latest releases).

Note that I use an uninstalled GStreamer source tree from git, which I highly recommend. Refer to http://svn.sat.qc.ca/trac/scenic/wiki/GstUninstalled for a brief overview on how to get that going.
Make sure that after running autogen.sh or configure, the vp8 plugins are listed under those which will be built. If all has gone well, you should be able to get a plugin description from gst-inspect vp8.

Now to test with your favourite GStreamer pipeline. Run something like:
gst-launch -v v4l2src ! video/x-raw-yuv, width=320, height=240 \
! ffmpegcolorspace ! vp8enc max-latency=1 ! vp8dec \
! xvimagesink sync=false


(hopefully) Success! My thanks go out the GStreamer developers for yet another great contribution.

Wednesday, May 20, 2009

Making your own one-step build in Ubuntu

It's been a while, so I thought I could at least share something quick that Koya Charles and I came up with yesterday. Koya's done a lot of work to make sure that Scenic's autoconf/build setup stays sane. The one important feature we were missing was a "one button build". Typically, I'd do something like:

cd PATH_TO_TRUNK
./autogen.sh && ./configure && make -j4 && sudo make install

Note the -jn flag which tells make to build n sources in parallel, good if you have a multicore machine (see Jeff Atwood's argument on the quad-core vs. dual-core debate, particularly the 'Comments' section for relevant discussion).

So Koya and I made a shell script to do this:

cd "`dirname $BASH_SOURCE`/../../trunk"
notify-send -t 2000 "Building scenic..."
make -j4 && gksu make install && notify-send -t 10000 "Done building scenic"


First, the variable $BASH_SOURCE evaluates to the location of the build script in question. We then use this to get the path to our source tree (as both are in our repository). We then call notify-send (requires libnotify-bin) to show a popup telling us that the build is being attempted. We then compile and call gksu, as this is intended to be used via a hotkey, instead of plain sudo for the make install. Provided the make and make install were successful, we again use notify to post a popup that the build is done. You should make this script executable with

chmod u+x your_build_script.sh

This script can be called from the command line, but to be even more useful I made a hotkey for it.


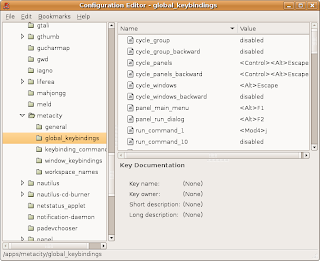
Running gconf-editor, you can edit what keybindings you have for your global workspace, with the following steps:
  1. run gconf-editor from a terminal (or just Alt-F2, then type in gconf-editor in the "Run Application" window that appears).
  2. click on the tab for apps, under /
  3. click on the tab for metacity, under apps
  4. click on global_keybindings
  5. in the adjacent window, right-click on run_command_1 (assuming it's disabled, otherwise use the first run_command_x listed as disabled) and click Edit key.
  6. I use F5 (as in the F5 key) for my binding, but it can be whatever you choose. Just type 'F' and '5' in the Value: field, NOT the F5 key itself, to get this binding.
  7. Next, click on the tab keybinding_commands, right below global_keybindings, and right-click on command_1 (or whichever you chose) and click Edit Key.
  8. In the field labelled Value:, enter the path to your build script, for example: /home/tristan/devel/scenic/inhouse/misc/build_scenic.sh
Now, I can build my project no matter what window is in focus, without opening a terminal, just by hitting the F5 key.

Monday, February 9, 2009

Snapshots from a live video source in gstreamer

EDIT: A helpful reader pointed out that using videorate in the pipeline should do the trick, something like:
gst-launch -v v4l2src ! tee name=t ! queue ! xvimagesink t. 
! queue ! videorate ! video/x-raw-yuv, width=640, height=480, framerate=1/1 ! jpegenc ! 
filesink location=test.jpeg
I'm fairly sure I tried this before with no success, but it works fine now. There have been some major bugfixes to videorate since I wrote this. In any case, I'll leave the rest of the article up in the hope that it is still useful.

As part of the propulse[ART] project, we wanted to add a "preview" feature to the existing audio/video engine. This involves writing a frame of video every second to a jpeg file, while displaying the video at a full 30 fps in a window. I was surprised to discover that this feature was not already implemented in gstreamer for live sources (to the best of my knowledge).
This should probably be implemented by a real gstreamer element, but for our purposes a relatively straightforward hack prototyped in streamshot.cpp was sufficient. The video pipeline consists of a video4linux source, a capsfilter to enforce some properties on the video, an ffmpegcolorspace element, and an xvimagesink. We attach a callback to the source pad of the video4linux source that is called every time our source has a new buffer of data (i.e. a frame). Since timing is not a big concern, the cb_have_data callback knows to only write a file every second by checking a boolean value that is periodically set to true by a separate callback. The cb_have_data function makes a copy of the buffer, swaps its red bytes with its blue bytes (swapping the red_mask and blue_mask in the caps did not work for some reason) and writes the modified buffer to a jpeg, line-by-line. The jpeg writing code was based on Andrew White's Xlib screenshot example. Thanks also to Koya Charles for help debugging this example, as well as the byte swapping.
The final version of the preview feature will probably happen entirely in a separate thread and not involve file-writing, but rather be streamed as these frames will be part of our web-interface.


Update: To make up for this entry's lack of flashiness, enjoy this code_swarm video of the propulse[ART] software's (codename miville) development so far (code_swarm instructions courtesy of amix.dk):

Wednesday, December 24, 2008

Computer Vision on OS X with Python and OpenCV

After my macbook's sudden demise and spontaneous, inexplicable regeneration, I've decided to try and port some things I've worked on in GNU/Linux to OS X. Also, having a built-in microphone and camera on a portable computer is pretty amazing when you work primarily with audio and video and need to test things.

I was really happy with how my previous forays in pygame had been going, so over the holidays I thought I 'd try and make a version of my previous camLoops prototype, but for OS X.
Also, at Alexandre Quessy's invitation, I've added cam_loop.py to the ToonLoop project. More on that in the coming weeks, so stay "tooned" (if not put off by that terrible pun).

*UPDATE The initial opencv version of camLoops is now available. I've only tested it on a MacBook running OS X so far, but it should also work in GNU/Linux.

I did some research online and there did not seem to be much in the way of camera- frame-grabbing modules for OS X with python bindings (granted it is a pretty niche area). The most complete are Apple's QTKit, the Cocoa framework (which has python bindings) for Quicktime and OpenCV, or Open Source Computer Vision, which is a cross-platform, BSD-licensed library written in C with Python bindings. Since I have no interest in wasting time using a Mac-only, proprietary framework like QTKit, the choice was pretty obvious. The installation, however, was not.

Given my heavy use of fink packages (when I should really just give in and roll GNU/Linux on my laptop), I am used to having to fight with cross-platform librairies/frameworks. I was even pleased to find an OS X specific build instruction page on the OpenCV wiki. It's quite likely that my approach is not the best solution for building but it's what worked for me.

I decided for better or worse to get the current production version of Python, which is 2.6.1 at the time of this writing. I grabbed the disk image and ran the installer (and breathed a sigh of relief). For pygame to work, I had to get PyObjC, which is used to build Cocoa apps for OS X in Python. This is not required for OpenCV, so skip ahead if you're not using pygame. This also required an svn checkout of the 1.4 branch of pyobjc which works on Tiger, as no slick disk-images with installers are available from the website at present. To grab the branch, do:

svn co http://svn.red-bean.com/pyobjc/branches/pyobjc-1.4-branch pyobjc

Fortunately, the PyObjC people know their target audience and all it took once in the pyobjc directory to make a nice installer was:

python setup.py bdist_mpkg --open


*UPDATE Previously OpenCV was using CVS for version control, they have since migrated to Subversion. Check out a clean version with:

svn co https://opencvlibrary.svn.sourceforge.net/svnroot/opencvlibrary opencvlibrary
In the INSTALL file, it is suggested that you do autoreconf -i --force
This failed for me (even though my autotools are up to date) so i used the pre-existing configuration files and left autoconf alone.


In the opencv directory, create a build directory and enter it with mkdir build; cd build


From the build directory, run configure with a few flags set (replace sw with /opt/local if you are using darwinports instead of fink):

../configure CPPFLAGS="-I/sw/include" LDFLAGS="-L/sw/lib" --with-python

Now compile and install with make && sudo make install. You will be prompted for your password.

Edit your ~/.profile to include the following two lines, which will be different if you set the --prefix option on your configure script to something other than the default /usr:

LD_LIBRARY_PATH=/usr/local/lib:${LD_LIBRARY_PATH}
export LD_LIBRARY_PATH
PYTHONPATH=/usr/local/lib/python2.6/site-packages:${PYTHONPATH}
export PYTHONPATH

To test that everything worked, run your python interpreter and try import opencv. Provided that there is no errors such as 'no module opencv', you can start trying the python examples in the samples directory.


I ran python facedetect.py 0, where 0 is the index of the camera you want the program to use. The program then draws a red square around what it thinks is your face. Extra points for being beard proof, and hats off to Mark Asbach for his work on OS X support for OpenCV.